Parallels just released a new patch to their software which lets me run Windows Vista and Mac OS X simultaneously. I highly recommend that everybody using Parallels 3 Update to Parallels Build 4560 sooner rather than later.
In the previous build of Parallels (4128) - Windows Vista would suck up 70-107% of my Mac's CPU even when Vista was idle! (I think CPU usage can go over 100% because I have a dual-core Core Duo 2 machine).
But now with Parallels Build 4560 - Vista still sucks - but it sucks less...only 24-47% now. And that is good enough to leave Windows running full-time on OS X with Vista in Parallels.
The image above is my MacBookPro connected to a second monitor. The MBP's laptop screen is running OS X full-screen, and the second monitor is running Windows Vista full-screen. Today - I'm 200% more productive thanks to that Parallels patch.
Thoughts about random things on the Web regarding Life, Software Development, Video Games, Photography, and Raising Kids....
Friday, July 20, 2007
Using Eclipse and CVS Source Code Control on Mac OS X
The new project I just joined is waiting to get their source control system installed...so in the meantime -- I felt inclined to provide a interim solution until their permanent server arrives.
I was able to get a local copy of CVS up and running on my MacBook Pro. Along the way - I learned a little more about the Mac Firewall and service configuration that I thought I'd share... (this stuff isn't obvious to somebody who just switched to the Mac)
The following article from Apple gives very good instructions about how to run CVS via command-line instructions: Version Control with CVS on Mac OS X
That's the easy part -- running CVS via command-line worked right away without any problems. The challenges started when I tried to connect Eclipse to the CVS server hosted on my Mac.
First, Eclipse needs to connect to CVS through a network connection. And by default ssh is disabled. If you type the following command - you may see the same error I did:
ssh your-machine-name
ssh: connect to host your-machine-name port 22: Connection refused
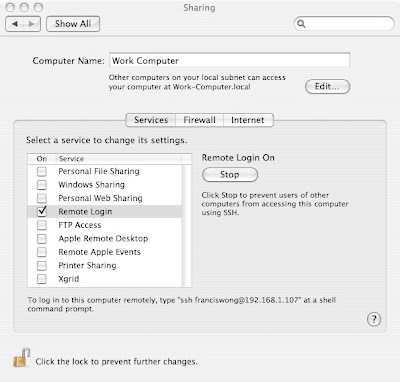
The recommended way to establish communication to CVS is via SSH - and although SSH is pre-installed on OS X, it is disabled by default. You will need to enable SSH to support secure host communications. Visit System Preferences / Services
And while you are there - it would be a good idea to click the "Firewall" button and enable the mac Firewall (it's DISABLED by default!). And be sure to check "Remove Login - SSH" to let SSH connections through the firewall.
Next - start a Terminal Session (Applications/Utilities/Terminal) to test ssh connectivity using the following command:
ssh your-machine-name
If enabled, you should not be prompted for a password. You may also see the following error: "The authenticity of host...can't be established." This is because we are cheating slightly and not generating SSH host keys. Ignore this for now and when prompted "Are you sure you want to continue connecting" - answer YES. In my case - I was connecting from my own machine to my own machine's CVS server. For other machines - I will expend the extra effort to generate SSH keys and pass their public keys to the client systems.
Now - cvs is installed, and ssh is configured. The next step is to connect eclipse to CVS. I found this link to be very helpful: Eclipse and cvs
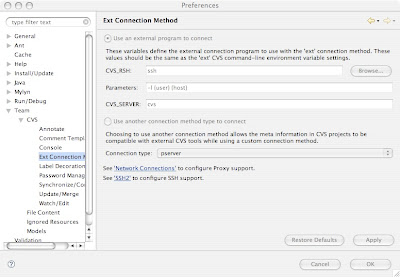
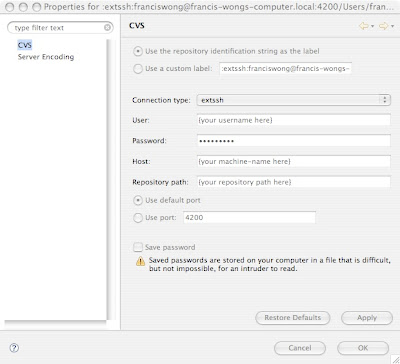
Screen-shots of my eclipse settings are below:
So if you want to use SSH at its default port of 22 - then you are done.
But if you want a more secure environment -- I took the extra steps to choose a different port number for SSH as recommended in this security article (See Rule#4):
Basic Mac OS X Security
You may with to do the same to confuse people scanning for Port 22.
I was able to get a local copy of CVS up and running on my MacBook Pro. Along the way - I learned a little more about the Mac Firewall and service configuration that I thought I'd share... (this stuff isn't obvious to somebody who just switched to the Mac)
The following article from Apple gives very good instructions about how to run CVS via command-line instructions: Version Control with CVS on Mac OS X
That's the easy part -- running CVS via command-line worked right away without any problems. The challenges started when I tried to connect Eclipse to the CVS server hosted on my Mac.
First, Eclipse needs to connect to CVS through a network connection. And by default ssh is disabled. If you type the following command - you may see the same error I did:
ssh your-machine-name
ssh: connect to host your-machine-name port 22: Connection refused
The recommended way to establish communication to CVS is via SSH - and although SSH is pre-installed on OS X, it is disabled by default. You will need to enable SSH to support secure host communications. Visit System Preferences / Services
And while you are there - it would be a good idea to click the "Firewall" button and enable the mac Firewall (it's DISABLED by default!). And be sure to check "Remove Login - SSH" to let SSH connections through the firewall.
Next - start a Terminal Session (Applications/Utilities/Terminal) to test ssh connectivity using the following command:
ssh your-machine-name
If enabled, you should not be prompted for a password. You may also see the following error: "The authenticity of host...can't be established." This is because we are cheating slightly and not generating SSH host keys. Ignore this for now and when prompted "Are you sure you want to continue connecting" - answer YES. In my case - I was connecting from my own machine to my own machine's CVS server. For other machines - I will expend the extra effort to generate SSH keys and pass their public keys to the client systems.
Now - cvs is installed, and ssh is configured. The next step is to connect eclipse to CVS. I found this link to be very helpful: Eclipse and cvs
Screen-shots of my eclipse settings are below:
Eclipse - Ext Connection Method configuration window.
Eclipse - CVS Repository settings
So if you want to use SSH at its default port of 22 - then you are done.
But if you want a more secure environment -- I took the extra steps to choose a different port number for SSH as recommended in this security article (See Rule#4):
Basic Mac OS X Security
You may with to do the same to confuse people scanning for Port 22.
Saturday, July 7, 2007
Internet Anywhere! Connecting the Cingular SYNC (Samsung SGH-A707) to a MacBook Pro via AT&T
The following articles helped me get my Samsung SYNC talking to my MacBookPro:
Tether Your Smartphone To Your Mac, Ross Barkman's Home Page, and Tethering on the Samsung A707
After buying my MacBook Pro with built-in Bluetooth - I couldn't wait to tether it to a cellular phone and get Internet connectivity anywhere I have cell-phone coverage.
But first - I had to upgrade my old cell-phone, the Nokia 6030. A great phone, small, reliable, but a little low on gadgets by today's standard.
I knew I wanted a 3G capable phone, but since I'm prone to losing phones, I also didn't want to spend a lot. AT&T had a special for their Samsung SYNC phone this weekend that was just what I wanted -- only $49 with a 2-year contract (after $50 rebate). What attracted me to this phone was:
They also had the Motorola Razr V3xx phone for $FREE$ with a 2-year contract. But I picked up both, and liked the feel of the buttons on the Samsung SYNC better. The SYNC also had a 2M camera vs. a 1.3M camera.
Note: Make sure you add an appropriate data plan to allow data transfers.
And, be sure you are running Mac OS X v10.4.9 or higher in order to get the latest bluetooth updates.
Getting the Mac talking to the Samsung took me about an hour...but hopefully - I can reduce the work to only 15 minutes for anybody reading this post..
Samsung
MacBook Pro
Your Samsung SYNC phone may ask a question periodically..."DUN Connect with the MacBook Pro computer?". Obviously, you should answer YES.
If everything went smoothly - you should now be connected to the internet on your MacBook Pro through your Samsung SYNC phone!
And if you want the MacBook to seamlessly connect to your Samsung SYNC so you don't even have to pull it out of your pocket! That's possible also. Visit the following menu on the SYNC: Menu / Settings / Connectivity / Bluetooth / My Devices. Choose your computer from the list. Click Options. Then "Authorize Device". Once your MacBook Pro is authorized, you will no longer be prompted for any bluetooth activity!
Tether Your Smartphone To Your Mac, Ross Barkman's Home Page, and Tethering on the Samsung A707
After buying my MacBook Pro with built-in Bluetooth - I couldn't wait to tether it to a cellular phone and get Internet connectivity anywhere I have cell-phone coverage.
But first - I had to upgrade my old cell-phone, the Nokia 6030. A great phone, small, reliable, but a little low on gadgets by today's standard.
I knew I wanted a 3G capable phone, but since I'm prone to losing phones, I also didn't want to spend a lot. AT&T had a special for their Samsung SYNC phone this weekend that was just what I wanted -- only $49 with a 2-year contract (after $50 rebate). What attracted me to this phone was:
- 2M Camera
- Bluetooth Support
- 3G network support
- And most importantly, Bluetooth DUN support
They also had the Motorola Razr V3xx phone for $FREE$ with a 2-year contract. But I picked up both, and liked the feel of the buttons on the Samsung SYNC better. The SYNC also had a 2M camera vs. a 1.3M camera.
Note: Make sure you add an appropriate data plan to allow data transfers.
And, be sure you are running Mac OS X v10.4.9 or higher in order to get the latest bluetooth updates.
Getting the Mac talking to the Samsung took me about an hour...but hopefully - I can reduce the work to only 15 minutes for anybody reading this post..
Samsung
- Menu / Settings / Connectivity / Bluetooth
- Set Activation to ON
- Set My Phone's Visibility to ON
- Set My Phone's Name to whatever you want
MacBook Pro
- Visit Ross Barkman's Home Page and download the Generic 3G Scripts
- Expand the downloaded file with StuffIt Expander, and copy the file "Generic 3G CID1" to the directory "Library:Modem Scripts"
- System Peferences / Bluetooth
- Click Set Up New Device...
- Choose "Mobile Phone" as the Device Type
- The Assistant will now search for your mobile phone, and it should be listed
- Select your phone, and press Continue
- The first time your MacBook Pro communicates with your Samsung SYNC phone, you must approve the pairing with a pass key. A numeric passkey will be shown on the MacBook. At the same time, the Samsung SYNC should display a dialog window asking for the passkey. Enter the numeric key from the MacBook into the Samsung
- Select Services you want to use. Choose "Use Address Book", "Access the Internet with your phone's data connection", and "Use a direct, higher speed connection to reach your Internet Service Provider"
- Press Continue
- Click Continue / Quit
- Select System Preferences / Network
- Select Show: "Bluetooth"
- Click PPP, and your Bluetooth settings should be already populated
- Click Dial Now..., and another window will appear...
- Click Connect
You will be prompted for information specific to the Cingular network. Use the settings below:
Username: WAP@CINGULARGPRS.COM
Password: CINGULAR1
GPRS CID String: ...leave this field blank...
Modem Script: Generic 3G CID1
Service Provider: Enter whatever you want here
Account Name: WAP@CINGULARGPRS.COM
Password: CINGULAR1
Telephone Number: Leave Blank!
Alternate Number: Leave Blank!
Your Samsung SYNC phone may ask a question periodically..."DUN Connect with the MacBook Pro computer?". Obviously, you should answer YES.
If everything went smoothly - you should now be connected to the internet on your MacBook Pro through your Samsung SYNC phone!
And if you want the MacBook to seamlessly connect to your Samsung SYNC so you don't even have to pull it out of your pocket! That's possible also. Visit the following menu on the SYNC: Menu / Settings / Connectivity / Bluetooth / My Devices. Choose your computer from the list. Click Options. Then "Authorize Device". Once your MacBook Pro is authorized, you will no longer be prompted for any bluetooth activity!
Labels:
Bluetooth,
Cingular,
Cingular SYNC,
MacBook Pro,
SGH-A707
Friday, July 6, 2007
Installing Oracle 10g on an Intel-based MacBook Pro using Parallels
I was switching to a new client this month, so I decided to treat myself to a top-of-the-line 17" Apple MacBook Pro. I've seen a lot of co-workers at AOL walking around the building with the MBP and I was hit with Mac-envy.
After a few days...Although I still love the machine, my first week did not go smoothly.
My original goal was to install Oracle 10g, and eclipse to emulate the Unix development environment on my MacBook Pro. So I started by downloading Oracle 10g from the Oracle site itself:
Oracle Download Site
There is a link on this page for "Oracle Database 10g Release 1 (10.1.0.3) for Mac OS X Server". If you have an Intel-based MacBook Pro like me (Core Duo 2), THIS WILL NOT WORK! I spent hours working through the pre-install documentation over and over again to find out where I was doing wrong.... It turns out that Oracle 10g (as of v10.1.0.3 which was the latest version for OS X on Mac as of July 2007), does not work on Intel-based Macs!
So since I can't run 10g on Mac OS X natively -- I thought I'd use Apple's Boot Camp to run 10g under XP or Vista.
And knowing that the Core Duo 2 chips are 64-bit chips - I purchased a copy of Vista 64-bit Home Premium. That was the start of my second mistake.
Apple Boot Camp
Although Windows Vista 64-bit Home Premium was booting on my MacBook Pro, I had no networking support, no sound, and no ATI exhanced graphics support. After struggling with Boot Camp for another few hours, I discovered, that Boot Camp v1.3 (the latest as of July 2007) does not work with 64-bit Windows operating systems! Well, it actually does, but you won't have audio drivers, network drivers, camera, extended keyboard, or extended USB support.
After more research, I stumbled upon this link which describes how to install a Red-Hat clone using Parallels in Mac OS X in order to run Oracle 10g.
Install Oracle 10g on an Intel Mac
If I found this link first, I might have been willing to try it. But at this point, I was exhausted. So I took the easy route.
This is the solution I eventually settled upon:
This all worked perfectly -- and now I could dual-boot my MacBook Pro and have a true Windows environment or true OS X environment.
Random Mac Tips:
Next I installed "Oracle Database 10g Release 2 (10.2.0.1.0) for Microsoft Windows" from the Oracle download page.
Oracle download page
Important Note! If you do not have a fixed IP address, you will need to install the Microsoft Loopback Adapter and choose a fixed IP address. Do this BEFORE installing Oracle, or else you will most likely have to remove and re-install Oracle.
KnowledgeBase article about installing the Microsoft Loopback Adapter
Now Oracle 10g should install without a problem.
Then, I decided to push my luck, and try out Parallels. Parallels gives me a virtual Windows machine within a running Mac OS X environment. There is a 15-day free trial available.
Parallels Desktop for Mac
Parallels installed flawlessly, and identified my BootCamp parition and created its own variant of the BootCamp launch configuration.
Once completed - Windows XP was running within a window on my Mac OS X desktop!
One last piece was missing though, the Mac could not communicate to Oracle within Parallels Desktop. By default, XP Home installs a Windows Firewall. What Parallels does is create two separate virtual machines running on the same MacBook Pro. So although they are on the same desktop and same machine, they cannot talk to each other because Windows has its own Firewall.
Visit the Windows Control Panel / Firewall Settings, and add Oracle-friendly-ports such as 1158, 1521, and 5560.
Now - within a single desktop environment - I can build applications in Java on OS X while accessing Oracle 10g on Windows.
After a few days...Although I still love the machine, my first week did not go smoothly.
My original goal was to install Oracle 10g, and eclipse to emulate the Unix development environment on my MacBook Pro. So I started by downloading Oracle 10g from the Oracle site itself:
Oracle Download Site
There is a link on this page for "Oracle Database 10g Release 1 (10.1.0.3) for Mac OS X Server". If you have an Intel-based MacBook Pro like me (Core Duo 2), THIS WILL NOT WORK! I spent hours working through the pre-install documentation over and over again to find out where I was doing wrong.... It turns out that Oracle 10g (as of v10.1.0.3 which was the latest version for OS X on Mac as of July 2007), does not work on Intel-based Macs!
So since I can't run 10g on Mac OS X natively -- I thought I'd use Apple's Boot Camp to run 10g under XP or Vista.
And knowing that the Core Duo 2 chips are 64-bit chips - I purchased a copy of Vista 64-bit Home Premium. That was the start of my second mistake.
Apple Boot Camp
Although Windows Vista 64-bit Home Premium was booting on my MacBook Pro, I had no networking support, no sound, and no ATI exhanced graphics support. After struggling with Boot Camp for another few hours, I discovered, that Boot Camp v1.3 (the latest as of July 2007) does not work with 64-bit Windows operating systems! Well, it actually does, but you won't have audio drivers, network drivers, camera, extended keyboard, or extended USB support.
After more research, I stumbled upon this link which describes how to install a Red-Hat clone using Parallels in Mac OS X in order to run Oracle 10g.
Install Oracle 10g on an Intel Mac
If I found this link first, I might have been willing to try it. But at this point, I was exhausted. So I took the easy route.
This is the solution I eventually settled upon:
- Install Apple Boot Camp (free). Be sure to the read the Boot Camp documentation, you will need a blank CD-R and a real installation disk of some variant of a 32-bit Windows operating system (XP, or Vista).
- Partition your drive via Boot Camp. I chose NTFS for my file-system.
- Install Windows XP via Boot Camp
- After the full XP installation is completed, you will need to run the Boot Camp CD that was burned by Boot Camp while in the fresh-Windows installation in order to install Windows drivers for all the MacBook Pro devices.
This all worked perfectly -- and now I could dual-boot my MacBook Pro and have a true Windows environment or true OS X environment.
Random Mac Tips:
- Hold the "Option" key to choose which partition you want to use while booting.
- Press the TrackPad while booting to eject the CD
Next I installed "Oracle Database 10g Release 2 (10.2.0.1.0) for Microsoft Windows" from the Oracle download page.
Oracle download page
Important Note! If you do not have a fixed IP address, you will need to install the Microsoft Loopback Adapter and choose a fixed IP address. Do this BEFORE installing Oracle, or else you will most likely have to remove and re-install Oracle.
KnowledgeBase article about installing the Microsoft Loopback Adapter
Now Oracle 10g should install without a problem.
Then, I decided to push my luck, and try out Parallels. Parallels gives me a virtual Windows machine within a running Mac OS X environment. There is a 15-day free trial available.
Parallels Desktop for Mac
Parallels installed flawlessly, and identified my BootCamp parition and created its own variant of the BootCamp launch configuration.
Once completed - Windows XP was running within a window on my Mac OS X desktop!
One last piece was missing though, the Mac could not communicate to Oracle within Parallels Desktop. By default, XP Home installs a Windows Firewall. What Parallels does is create two separate virtual machines running on the same MacBook Pro. So although they are on the same desktop and same machine, they cannot talk to each other because Windows has its own Firewall.
Visit the Windows Control Panel / Firewall Settings, and add Oracle-friendly-ports such as 1158, 1521, and 5560.
Now - within a single desktop environment - I can build applications in Java on OS X while accessing Oracle 10g on Windows.
Subscribe to:
Posts (Atom)